Sunday, April 29, 2007

Part Three of Apron Tutorial

OK, we have cut out the bib, apron skirt, waistband, pocket. You will have a section of shirt left that was the former upper back of the shirt. It is the part from the armpits to the bottom of the back yoke. I used this section to cut my back ties from. When they are attached to the waistband, they will tie around up to a 36 inch waist. The smaller the waist the more back tie tails you will have left when you tie it. Here is where I wished I would have seam ripped the pocket off of the front of the shirt, then I would have had longer pieces of fabric for the back ties....If you seam rip the pocket off then you have that whole button hole side of the front of the shirt as fabric. Cutting around the pocket was easy, but I wasted alot of fabric doing it.


Take your collar and the collar yoke and seperate them. I am going to use the collar yoke for the neck strap. Fold the collar yoke in half, lining up the button to the button hole and then cut it on the center fold. You will use the button and its button hole to attach the bib around your neck!! Cool Huh? I will then take that colar and cut it into a lengthwise rectangle and separate the lining from the outside piece and use those for the loops to attach the neck tie to the bib. It will be a loop affect on the bib and the former (now cut in half collar yoke) will be inserted through the loop and sewn to itself. Now you have made a buttoned back neck tie that you don't have to make a button hole or sew on a button for!!. You can neaten it up by finishing the edges of the yoke strip with 1/4" seam binding.

Next, open up your sleeves. Don't cut off the bottom hem...use that for the hem of your ruffle. Cut straight across both sleeve fabrics at the former armpit line, straighten out your edges, and you now have fabric for your ruffle!! Make sure it is slightly wider than the bottom width of your shirt/apron skirt hem. Here is the apron laid out on the floor before any construction to check to see if the parts will work as cut.

Now I promised you a little surprise for the waistline of the apron. A detachable bib...the easy, squeezie way!! In the photo you will see the bottom of the bib lined up with the fabric from the front of the shirt below where I cut off the pocket. It is the buttonhole placket. Cut that placket away from the shirt fabric, leaving yourself a 1/2 inch seam allowance outside of the edge of the placket. If you click on the photo, you will see what I mean. Then turn the placket over and trim this selvedge close to the stitching on the back side of the placket. You will sew this to the inside of the waistband facing...show completed in the next photo. Follow the original shirt stitching lines as your stitching guide, and fold under the cut edges on the ends of the placket. Be sure to line up the center buttonhole with the center of the waistband. Which will also match the center button of the bib!! Then when you want to attach your bib...it will line up and slide into this button hole placket on the inner waistband!! You could also easily sew it on the inside of your waistband as your last step....its just that the stitching will show on the completed waistband on the front if you do this last, but if you don't mind that, it is easier to do it that way! You could always cover the stitching with rick rack or a pretty wide ribbon trim or just let it go and show!
The next photo shows the completed apron....so how did I go from here to there? I just sewed it together using any standard apron sewing instructions. After you obtain the fabric from the shirt, the rest is just standard apron construction!!! With of course a few minor adjustments like the detachable bib using the button plackets!!!

Oh, for the ruffle, you can leave the ruffle off and just decorate the hem with rick rack. I just wanted to see if I could piece a decent looking ruffle. I was amazed how much fabric I could get out of that one short sleeved shirt. With some creative lay out, you can probably use a purchased pattern to lay out your apron. Finish your raw edges with bias tape. If you don't have enough fabric to do a neck tie, you can always use a coordinating bias tape for the ties. Just sew them closed close to the open edge and attach like any other neck tie. On the completed apron below....I have not used the collar placket for the neck tie. I am waiting to customize it for the winner of this apron. I have a temporary seam binding neck tie for the photo.

And Voila' you have a beautiful functional apron for just $2.85!! Oh here is the view of the half apron....the same apron, two looks!! I hope you enjoyed this tutorial....please email me if you have any questions on this.
This is more than I usually like to spend on a thrift store shirt, but the colors were so beautiful! I could do this apron for alot less, depending on the price of the shirt and if I made my own bias tape with a coordinating shirt or thrifted fabric!! You could make this apron for less than $1 if you hit the thrift store on Wacky Wednesday!!

LOL...thanks for blogging with me today...phew....I'm tired!

Later, my friends! I hope you will try this simple shirt conversion and email me your photos, so I can post them on my blog giving you credit for your repurposed apron!!

Oh, one last thought. I made this on that 1936 white rotary that the dress form is standing near. It only has a straight stitch....so anyone can do this apron or one that is similar!!

Georgann

Saturday, April 28, 2007

Part Deux

I want to use this pocket on my apron so there are two ways to do it. Use a seam ripper and removed the threads stitches holding it onto the shirt and save it. The other way is to cut around the pocket leaving 1/2" of selvedge around the pocket. Flip the pocket over and cut out the shirt fabric close to the stitching. This will leave the pocket with the 1/2" selvedge. Press this selvedge under the pocket on all sides.

Save this pocket to sew onto the apron at your desired location. When stitching, you will use the original stitching line as a guide.

NOTE: if you cut the shirt around the pocket, then you will have less fabric to work with later. On this apron, I cut around the pocket to try this and see what would happen. I didn't want to be bothered with seam ripping.


Next, I cut up both side seams to the armpit of the shirt. I did this because I am reserving the front of the shirt for the bib on the apron. If I was making a half apron, I would not cut the side seams. I would use the fronts for the skirt of the apron, leaving the side seams intact.

Then fold your shirt in half down the center back, matching armpits. Locate your armpit and cut straight across the back from armpit to center back fold. This cutting line will be the waistline/top of your apron skirt. The shirt tail is the bottom of the front of your apron.
Cut off both short sleeves along the seam line and reserve those for the ruffle. Go ahead and cut open the underseam on the sleeve and lie it flat for use later.

Use the back yoke of the shirt for the waistband. When you cut the waistband and open up the yoke pieces, you will notice that one of the yoke/waistband pieces usually has nice ironed on interfacing. Use this interfaced piece for your outside waistband. NOTE: I used the waistband pattern piece from Mary Jane's new apron book for illustration purposes. When making an apron for myself, I like my aprons to wrap around my hips to my backside with about a 6 inch gap in back, so I take my waist size and subtract 5" and this leaves me a 6 inch opening after sewing 2--1/2" seams/hems.

Now it is time to work on the bib. NOTE: I again used the bib pattern piece from MJ's new book for illustrative purposes.

Lay your bib pattern piece (or use your own measurements from your waist to just above your bustline...however high you want your bib...plus 1" for seams/hems. In this case, I wanted to make a detachable bib, so I used the front placket for the bottom part of the bib. After you cut around one side of your bib, flip it over and cut the other side. (you can fold your fabric and make a fold line to place your pattern piece on.) I chose to fold the fabric over on itself, using that center button...of three buttons....as my center point, see the photo below too.

Match up the outer two buttons of the three on the placket, then cut your other side of the bib.

Friday, April 27, 2007

apron tutorial


Here goes:

Choose a man's shirt. Remember, the larger the shirt, the more fabric you will have. I try to retain as many finished details in the final apron as possible. (such as hems and finished edges, pockets, buttoned plackets.) A long sleeve shirt will give you really nice long ties.

For this project, I chose a 100% cotton with a beautiful woven pattern...not printed. It also has a stain resistant finish....extra benefit for an apron. It is a Large/short sleeve. Would have preferred the long sleeve, but couldn't resist the color and plaid pattern of this shirt.

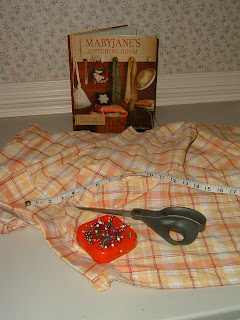
Then gather your supplies and inspiration! The only thing missing in this photo is the bias tape. I bought a package later in the day for $1.85 at Hancock fabrics. One package was enough to go around the bib and sides and will make a neck strap if that is what you choose to use.
More in the next entry.

Tutorial Preview


Many people have asked me to do a repurposing tutorial on making aprons from thrift store finds. Well here is a peek a couple of the tutorial photos. So after a question on MJ's Farmgirls today about where to get good heavy weight apron fabric that doesn't cost an arm, leg and your first born, I decided it was time to share one of my secrets....Thrift store fabric!!!

Take for example this beautiful man's shirt. It is 100% cotton and as an added bonus it is stain resistant. It was marked at $4 (which is too expensive for me to buy it) but it was 75% off day on all red tag items, so this red tagged shirt cost me $1. I was going to make some bias tape, but didn't have the just right shade of red, so I bought some for around $1.50. So we are up to a grand total of $2.50. I didn't have to buy any thread...I already have a stockpile of white thread. The last photo shows the cut out design layed out on the floor for a final check before I start sewing things together I haven't had time to sew the apron together, but I do have all of the presewing pressing done, so when I get to it later tonight, the actual sewing will only take about a half hour. This designing and cutting of the pieces took about 1hour today. I took photos all along during the design and cutting process, so I shall post those on my blog later today. I am going to use vintage deep read rick rack on i t for trim and will bind around the bib and the sides of the skirt. When I am done, I'll post finished photos of it on my blog and I may send it to some lucky farmgirl who posts on this blog about my apron!!

Good Luck and the finished apron will hopefully be up tonight or Saturday!! I'll have the completed tutorial up as soon as I can. Taking lots of detail photos and will have to write up the instructions too, so it will take awhile...but it will be up within the next few days.

Wednesday, April 25, 2007

The Final Circlet


Kim, when putting the adjustable chain and lobster claw on the back, I suddenly realized I forgot a terribly important stone, so I added another drop. Which actually only makes sense, because of the law of three. I added a rose quartz in a silver bead cage. It is lower slightly, than the other drop and be sure to wear it on your left side so it is closer to your heart. The purpose of this will be clear when you read about Rose Quartz below!! It is the love stone!!

Rose Quartz

Alternate Names & Name Spellings: "Love Stone"

Metaphysical and Healing Properties Lore

Keywords: Love

Rose quartz is pink quartz that is often called the "Love Stone." It is a stone of unconditional love that opens the heart chakra to all forms of love: self-love, family love, platonic love, and romantic love. The high energy of quartz gives rose quartz the property of enhancing love in virtually any situation. In turn, this lowers stress. All in all it is a very soothing and happy stone.

Emotionally rose quartz brings gentleness, forgiveness, compassion, kindness and tolerance. It raises one's self-esteem and sense of self-worth. It helps balance emotions and heal emotional wounds and traumas, even grief, bringing peace and calm. Rose quartz removes fears, resentments and anger. It can also heal and release childhood traumas, neglect, and lack of love, in part by enhancing inner awareness. It can help with reconciliation with family and others. Overwhelming or unreasonable guilt is eased by rose quartz.

In the psychic and spiritual realms, rose quartz is often used to attract love, and for love spells. It is also used to ease the process of transition in dying. Rose quartz can be helpful for dream recall and dream work.

Okay, here it is!


Tuesday, April 24, 2007

Kim, I hope you like this circlet.


I chose the stones for their significance:
Moonstone: Stone of new beginnings, Connected to the moon and intuition. Soothes and calms emotional lability and overreactions. Reflective, makes conscious the unconscious, aids intuition and empathy. Feminine stone associated with psychic abilities and cleansing.

Amethyst: Powerful healer and protector, enhances psychic abilities and spiritual awareness. Clears aura, transmutes negative energy. Calms mind, enhances meditation and visualization. Disperses psychic attack. Ameliorates anger, rage, fear and resentment. Aids assimilation of new ideas.

Hematite: Grounding, protecting and balancing, boosts self-esteem. Aids concentration, focus, willpower, reliability and confidence. Enhances memory and original thought. Removes self-limitations. Dissolves negativity.

Silver: Silver is a mineral that is said to mirror the soul, strengthen the connection between astral and physical bodies, and enhance intuitive and psychic energies. Silver is mystically considered to improve speech, bring eloquence. It is also purported to attract, enhance and store the energies of gemstones, as well as draw out negative energies. Silver is related to the moon, and moon energies.

Pearl: Pearls attune the wearer to ebb and flow of life. They are calming and centering. They give purity and promote faith, charity, and integrity, truth and loyalty. They especially enhance personal integrity. They help one connect with the Goddess, the ultimate feminine energy. Pearls have been used to treat disorders of the digestive tract and muscular systems, as well as to aid fertility and to ease childbirth.

Here is your circlet. I do hope you like it. I will finish the back of it when you send me your head circumference at your front hairline! I'm afraid the photos don't really do it justice. The moonstones capture and refract the sunlight beautifully!!

Let me know what you think!!??


Here is the photo of the vintage patterns I found the other day. Kim look at the pattern in the opper left corner as you are facing the photo. Reallllly nice That is the dress I was thinking about for your friend.

Georgann

Thursday, April 19, 2007

A little blue apron...

Before I post a photo of the little blue apron that I just made, I want to take a moment and say thank you to everyone. You all wrote such wonderful notes to me on this blog and so many sent lovely cards and mementos. Gosh, I feel so privileged to have so many persons who care enough to send a card, a loving thought and just kindness. We sometimes focus on the negative and forget that there are so many loving kind people out there. So thank you to each and every one of you!! I'm going to get on over to MJ's and try to thank everyone!!

Ya'll are the greatest!!
**************************************************************************************

Hope you enjoy this little blue apron. It is a re-sew. I used one of my old dresses that I was going to donate, but loved the fabric so couldn't get rid of it. I was going to give this one away at MJ's, but my daughter saw it and fell in love with it. I joked that she really didn't have enough on the front topside, but she says, "Mom it's an apron, it is supposed to be big! LOL

This is the first thing that I have fully sewn on my old 1936 White Rotary. You can see it in the photos!!

I promise to do an apron give-away for July. I have some other sewing to do before I can even think of another apron. I did this one because I wanted to get to know the old machine. I love it, but my hubby just grinned and shook his head. He said it sounded like a tank, it rumbled the whole floor...he was in the basement. LOL....I swear when I get a new rubber roller/gasket thingey for it, it will sew through leather!!

Oh, the rick rack is vintage and the fabric was an old dress of mine. The pockets were thrifted from The Thrifty Quaker.

Oh, the apron giveaway will be from this blog perhaps and it will be a Christmas in July apron...I have some exquisite vintage fabric I'd like to use! Well, it is just a simple calico, but it is wonderful with a Christmas print on it!

Friday, April 13, 2007

Miracles


Mom's passing yesterday was a miracle in love. She loved life so much and fought so hard to maintain her dignity and independence, and she achieved her life's goal in the final minutes of her life. I never would have believed such a thing could happen if I hadn't been there right with her. She taught each of us something in her final breaths. I learned this had nothing to do with me at all. Often times I get caught up in situations, trying to be the everything to everyone, but her final needs had nothing to do with me, beyond my being an instrument in accomplishing the bigger event. I cared for her physical being, helping to keep her as alert and functioning as possible until the real mission was accomplished. I am honored to have been the caretaker in this event. The miracle happened between my mother and my two younger brothers. They have been at enmity for years which intensified at my father's death a few years ago. Well yesterday morning, very early...4:00am, all of my nursing instincts swore that mom was nearing her time...a mere few hours. So by 6:30 I was calling all of my siblings, one by one and holding the phone to her ear and had told them to please take this private time with her...only Mom would hear their final love messages for her. Each of mom's children and most of the grandchildren were called and were able to tell Grandma/mom there final thoughts and give her their love. We there in the room did the same thing. Around 10:00 am the hospice nurse arrived on her pre-arranged visit and said that Mom had passed on. She had no heartbeat, no pulse, no blood pressure, but she was still breathing. The Hospice nurse said that this would soon stop and to call her when it stopped and she would come back. Well.....it didn't stop. And after about 1 hour, her heart was beating and she had a faint pulse and her color came back, but she was still not responding to pain or touch or voice. We light a candle that was sent to me by one of my farmgirl friends. It was in a lovely holder with Jesus holding a lamb on it. We burned this for the rest of the day. We brushed her hair told funny loving stories, read to mom her favorite Bible passages, Dad's obituary that my brother wrote and a story I wrote about her as a child and her relationship with her grandmother. She breathed on. We couldn't figure this out, because her heart had become so faint and weak again.....but still she breathed on. Then about 6:00pm, my youngest brother called and was talking to my other brother....the two who were on the outs. They had a wonderful conversation, while my brother was sitting next to my mother. I walked into the room and heard how they were talking and laughing and sharing and said, "This is exactly what Mom has been waiting for. Her greatest wish over the past 5 years was for the two of you to be talking again." Right at that moment, Mom's breathing relaxed and she went home. Dear heavens......If I hadn't seen it and been a part of it, I never would have believed it."

Now I've witnessed death so many times over 24 years and been the last voice and last touch to so many people, and I swear, I have never seen anything like this. Mom without a heartbeat, no pressure and no pulse hanging on for hours and hours......for this family miracle to happen.

I also knew deep in my heart, that Mom and I were 100% ok. This had nothing to do with me....I was merely the instrument for this to be able to happen. I am humbled and I am so lucky to have had a mother....all the way to her end.

One last thought. My daughters age 7 and 9 were so involved with Mom's care that I am so very proud of their courage and love shown to their grandmother. They placed fresh picked flowers in her hair after helping me clean and dress her after her passing. Mom and I talked about the girls alot and she was so concerned that this may be too much for them to witness, but....this is the way it used to be. Old taking care of young, young taking care of old. They are just returning to a more loving way of caring for family and they proved to me that they are strong, loving children. They to see them give grandma one more cuddle. To touch her hand and caress her face and place flower in her freshly combed and braided hair. That is family love and courage.

Thanks for blogging with me....blessings,
Georgann

Sunday, April 08, 2007

Happy Easter!!!


Look what the girls made. I bought a calendar that has a cake of the month on it and the girls have really been looking forward to April's cake. They made it for Easter.

The ears are actually hot pink, not orange. They also left the coconut off of the bunny and just put it around for grass.

They are so proud of their bunny cake!

When I looked in the refrigerator last night after the girls went to bed. My younger daughter attached a note to the half eaten cake: "Dear Peter Rabbit, This was NOT a bunny. It is a white SQUIRREL!!" It also had an arrow pointing to the cake remains. LOL LOL...... She wanted to make sure that Peter Rabbit left her something on Easter morning. I don't know why she thinks it is Peter Rabbit, rather than the Easter Bunny delivering goodies this morning! Gotta love 'em.

Thanks for blogging with me and have a wonderful Holiday!

Saturday, April 07, 2007

Final thoughts...

Thank you for visiting today. Feel free to sit for a spell and wander through my archives of sewing projects, aprons, original poems and stories, musings and vintage treasures. I really love guests in my home....and if you wish, leave me a comment so I will know you were here! AG